A "slicer" comprises a list of member elements from a model hierarchy that you can use to filter the query by one or more elements at runtime. For example, if you add the Country hierarchy to a dropdown slicer, you can use it to filter the data query to include data from just one selected country from the hierarchy.
Slicers can also be used with measures to drive slightly different mechanisms, including:
- A "switching" effect, where the measure can be swapped out using the measure slice. These are known as variable measure sets.
- A "parameterization" effect, where a VALUE filter can be built using a given measure to numerically filter the query. (See below for more information.)
- Click here to learn about slicers in Discover.
Slicer Types
Slicers aren't just dropdown lists, you can add buttons, a tree, or even a date-time calendar to filter your presentation assets. The list of available types include:
- Drop Down: Adds a dropdown list that you can select one slice from.
- Multi Select Drop Down: Adds a dropdown list that you can select multiple slices from.
- Single Select Tree: Supports 'regular' hierarchies in both cube and SQL models. Adds a single-select tree, which you can navigate through to find the relevant element.
- Multi Select Tree: Supports 'regular' hierarchies in both cube and SQL models. Adds a multi-select tree, which you can navigate through to find and select relevant elements.
- List Box: Adds a single-select list within a box container.
- Multi Select List Box: Adds a multi-select list within a box container.
- Text Box: Adds a textbox with dropdown.
- Buttons: Adds single-select buttons, rather than a list.
- Multi Select Buttons: Adds multi-select buttons.
- Date Calendar: This calendar tool is a specialized slicer visualization designed to make it easier to use date-time hierarchies and their associated calculations. The date-time picker is automatically generated at runtime when using the dateKey hierarchy to create a slicer. As with other slicers, the date-time picker slicer can be customized from the slicer settings.
Date-Time Pickers are only supported for SQL models. This functionality is not currently supported for MS OLAP, Tabular, or SAP BW.
A Toggle is a special slicer visualization type that is only applicable to global binary parameters.
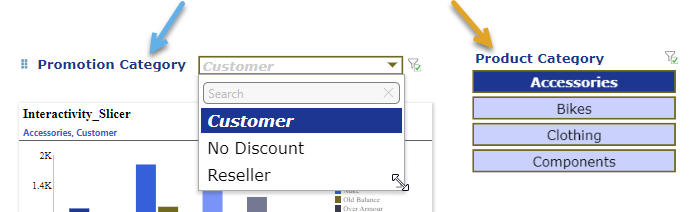
The following example shows a dropdown list (blue arrow below) and a set of single-select buttons (orange arrow) as they might appear in a presentation when viewed at runtime:
Adding Slicers to a presentation
There are various options for adding slicers to presentations:
- Add an existing slicer that was built in Discover. For more information, see Add Existing Slicers from Discover.
- Build a new slicer (either a quick slicer or an advanced slicer) on the fly in Present:
- Build a new quick slicer using the New Slicer option in the Toolbox.
- Build a new slicer using the Advanced Slicer wizard from the ribbon, Slicers panel, or interaction manager.
- Copy and paste an existing slicer from elsewhere in the presentation, or drag it onto the canvas from the Hidden Slicers panel. For more information, see Hidden Slicers.
Tip: When adding a new slicer in Present Pro, make sure the slicer and its target come from the same data model. If they don’t, an error may occur. To connect slicers and targets from different models, set up a model mapping to enable interaction. For more information, see Model Mapping in Present Pro.
Note: When you add slicers in Present, they usually affect visuals at runtime. When you make a selection, the slicer might filter data or update dynamic text. This works because interactions are created (typically automatically) between the slicer and other visuals, slicers, or dynamic assets.
Duplicate Slicers
When a new slicer is configured, it is connected to a data source and a hierarchy within that data source. There may be times when you want to add the same slicer to multiple slides in a presentation and when Pyramid informs you (using the New Slicer Warning dialog) that you are re-using a slicer that already exists (a duplicate slicer).
- Click here for information about Duplicate Slicers
Using Slicers at runtime
Although making a basic selection from a slicer is fairly intuitive, there are some extended interactions and related tasks that make them more powerful:
- You can make more complex selections; for example, multi-select and slicer search. For more information, see Making Slice Selections in Discover help.
- Once you have made certain selections across your slicers, you can "bookmark" your selections. This lets you return to those selections quickly and easily in the future. For more information, see Bookmarks.
- Actions can be attached to slicers in Present, so that when a user changes the slicer at runtime, it triggers an effect in addition to filtering queries. For more information, see Slicer Actions.
Editing and Styling Slicers
- To learn how to format your slicer in Present, click here.
- To learn how to style your slicer, click here.
Delete Slicers
Where the slicer is local to the presentation (is not linked to a discovery) it is deleted from Pyramid. Where the slicer is re-used from a discovery or has been made shareable, it is simply removed from the presentation.
- Click here to learn about deleting slicers from presentations.